Deploying Locally
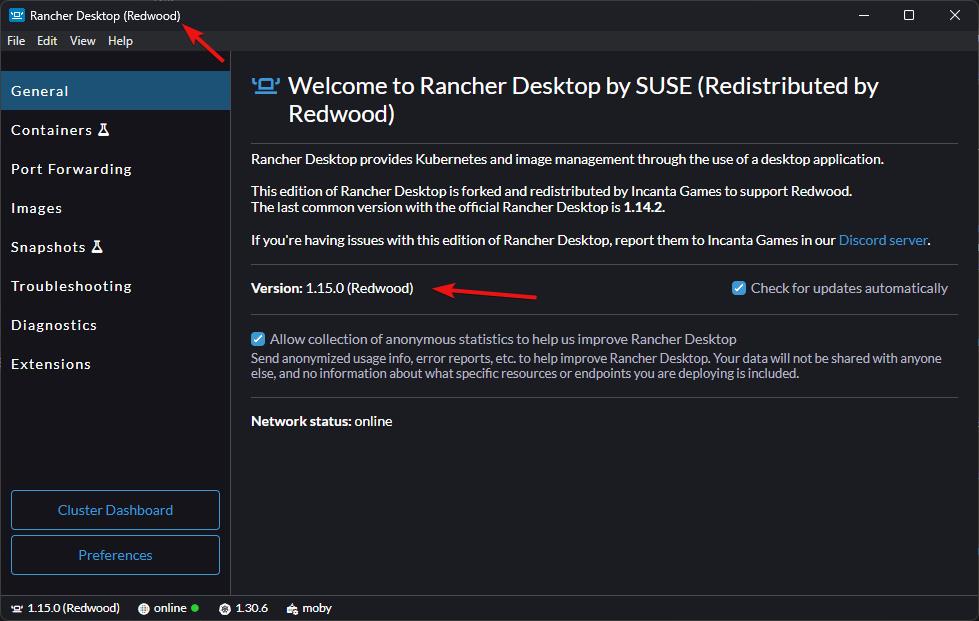
Make sure you have a Redwood-specific version of Rancher Desktop; it will have (Redwood) listed in the title and versions. If you don't have these, you'll need to follow the steps on uninstalling the current version and installing the new version.
How to check if you have the Redwood version
Deploying Redwood uses the provided Infrastructure-as-Code (IaC); the same workflow is used to deploy to a local development Kubernetes cluster as well as production ones.
If you installed all of the prerequisites properly, you're ready to test deploying the Redwood backend to your local Kubernetes cluster (which Rancher Desktop hosts within WSL). Altogether, this setup gives us a Linux environment that has Docker and Kubernetes, which is very similar to what deploying to a cloud provider would look like.
Redwood Configuration
While it's not strictly required to set up a configuration environment for development for just getting started, it will be convenient to have it when you inevitably want to change something.
-
Create a new folder in
config/nodefor the Kubernetes dev environment (e.g.redwood-demo-kubernetes[k8s is a common abbreviation for Kubernetes]) -
Create a
_config.jsonfile in that folder (e.g.config/node/redwood-demo-kubernetes/_config.json) with theparentNamespointing to the providedkubernetesenvironment and the environment folder you created earlier.For example:
{
  "parentNames": ["kubernetes", "redwood-demo"]
}warningThe order matters! The config system will read read these envs in order, overriding variables that were previously read in. You need to have
kubernetesbefore your config env as shown above.noteYou might have started to noticed the inheritance pattern we've been introducing for configuration. In our examples, we have the config env
redwood-demo-kubernetesinherit fromredwood-demo. Later, when we deploy to a cloud, you'll see that we'll introduce a config envredwood-demo-productionthat inherits fromredwood-demo-kubernetes. This pattern isn't required, but it can prevent issues where a config variable was added for development but not for production.You can read more about configuration inheritance here.
-
The documentation used to have you override
realm.instances.default.game-servers.providerto"local"in your base config environment, but this override is actually redundant and conflicts with thekubernetesparent config environment. You can either remove it from your original config (e.g.config/node/redwood-demo/realm/instances/default.yaml) or override it in this new config environment (e.g.realm-demo-kubernetes) such that the associated config variablerealm.instances.default.game-servers.provideris set to"agones".
Pulumi Configuration
Pulumi can run in different modes:
- Storing the Pulumi state locally
- This is the default for easy onboarding, but you should consider other options for teams and nearing launch
- Storing in another self-managed backend (e.g. S3, Azure Blob Storage, or Google Cloud Storage)
- Storing the Pulumi state in an instance of Pulumi Cloud
By default, Redwood is configured to store the Pulumi state locally, which is just fine when you're getting started. You may want to consider switching to use Pulumi Cloud (you can self-host or use Pulumi's managed service that's very affordable with a great free tier). We prefer using Pulumi Cloud over the other self-managed options like S3 due to the better integration and auditable records. However, having a shareable backend state is critical for teams and ensuring that your Pulumi deployment state isn't lost in the event of a personal computer loss.
-
In the folder you created above, create a
deployment/pulumi.yamlfile (e.g.config/node/redwood-demo-kubernetes/deployment/pulumi.yaml) with the contents:project: "<project-name>"For example:
project: "redwood-demo"noteIf you're using Pulumi Cloud, you'll also need to add to the file:
local-mode: false
org: "<pulumi-org-name>"
Redwood is pre-configured to work with Pulumi's managed service when
local-modeisfalse, but if you are self-hosting Pulumi Cloud, you can also change the URL to your Pulumi Cloud instance:url: "https://yourpulumicloud.com"noteSome IDEs (e.g. VSCode) will error about
pulumi.yamlhaving a syntax error because it's referring to another schema that Pulumi has for files namedpulumi.yaml. You can prevent this, at least in VSCode, by adding this line to the top of the file:# yaml-language-server: $schema=./pulumi.yaml
Deploying
Deploying locally for basic configurations is fairly straight forward:
-
Ensure Rancher Desktop is running
-
Open a terminal to the
RedwoodBackenddirectory -
Install the Node.js dependencies by running the below command:
yarnnoteyarnwill automatically trigger a build, but you can recompile manually by runningyarn build. -
Skip this if you have a Standard License of Redwood. If you have access to the full source code of Redwood, you need to package the sidecar:
yarn pkg:sidecar -
Create the folder
game-serversinRedwoodBackend/distif it doesn't exist -
Copy the folder generated when you packaged the Linux Server to
RedwoodBackend/dist/game-servers; it will have the nameLinuxServer -
Deploy the Redwood backend by running the below command:
yarn deploy <config-environment>Where
<config-environment>is the folder you created above (e.g.redwood-demo-kubernetes).This command will do the following:
- Create the necessary Docker images
- Deploy the necessary dependencies to the local Kubernetes cluster
- Deploy the Redwood images to the local Kubernetes cluster
noteDocker images are not automatically created in
yarn deployif you're inheriting from thestagingorproductionconfiguration environments. You will need to use theyarn dockercommand beforehand to create them. You can read more about this in Deploying Remotely. -
You may be prompted if you want to create the configured Pulumi stack. By default the stack is
dev, but you can override this in the abovepulumi.yamlfile withstack: "<stack-name>". If the name of the stack looks right, press theEnterkey. -
Pulumi will start generating a preview of the deployment; no changes are made and you'll be prompted if the proposed changes should be applied. Press the
Uparrow to selectyesand press theEnterkey:Created stack 'incanta/dev-mike'
Previewing update (incanta/dev-mike)
View in Browser (Ctrl+O): https://app.pulumi.com/incanta/redwood-demo/dev-mike/previews/2f235049-fc1c-49c7-9172-f20f374aed82
Type Name Plan
+ pulumi:pulumi:Stack redwood-demo-dev-mike create
+ ├─ docker:index:Image yourcr.com/container/redwood-dev-image create
+ ├─ docker:index:Image yourcr.com/container/game-server-image create
+ ├─ pulumi:providers:kubernetes k8s-provider-local create
+ ├─ kubernetes:core/v1:ConfigMap game-server-config-map-local create
+ ├─ kubernetes:helm.sh/v3:Release redis create
+ ├─ kubernetes:helm.sh/v3:Release ingress create
+ ├─ kubernetes:helm.sh/v3:Release open-match create
+ ├─ kubernetes:helm.sh/v3:Release mongo create
+ ├─ kubernetes:helm.sh/v3:Release agones-local create
+ ├─ kubernetes:core/v1:ConfigMap director-frontend-config-map-local create
+ ├─ kubernetes:core/v1:ServiceAccount realm-backend-account-local create
+ ├─ kubernetes:core/v1:ConfigMap director-backend-config-map-local create
+ ├─ kubernetes:rbac.authorization.k8s.io/v1:Role gameservers-allocations-role-local create
+ ├─ kubernetes:core/v1:ConfigMap match-function-config-map-local create
+ ├─ kubernetes:networking.k8s.io/v1:Ingress director-ingress-local create
+ ├─ kubernetes:agones.dev/v1:Fleet agones-fleet-local create
+ ├─ kubernetes:apps/v1:StatefulSet director-frontend-local create
+ ├─ kubernetes:autoscaling.agones.dev/v1:FleetAutoscaler agones-fleet-autoscaler-local create
+ ├─ kubernetes:apps/v1:StatefulSet match-function-local create
+ ├─ kubernetes:rbac.authorization.k8s.io/v1:RoleBinding read-gameservers-write-allocation-local create
+ ├─ kubernetes:core/v1:Service director-frontend-debug-local create
+ ├─ kubernetes:core/v1:Service director-frontend-local create
+ ├─ kubernetes:core/v1:Service match-function-debug-local create
+ ├─ kubernetes:core/v1:Service match-function-local create
+ ├─ kubernetes:apps/v1:StatefulSet director-backend-local create
+ ├─ kubernetes:core/v1:Service realm-backend-local create
+ ├─ kubernetes:core/v1:Service director-backend-debug-local create
+ └─ kubernetes:core/v1:Service director-backend-local create
Outputs:
k8sId: "Local Deployment"
Resources:
+ 29 to create
Do you want to perform this update? [Use arrows to move, type to filter]
yes
> no
detailsnoteYou can skip Pulumi previews with the
-sor--skip-previewarg or still see the preview but automatically accept it with-yor--yes. -
The deployment will be finished when the output stops changing and you see the final output similar to the below:
Outputs:
    k8sId: "Local Deployment"

Resources:
    + 32 created

Duration: 2m8s
Testing
Connection
When you're using Kubernetes to host the backend instead of the Dev Initiator, the client no longer connects to the backend on port 3001. Instead, hostnames are used to figure out which microservice a request is supposed to route to. This is why we needed to set up our director.localhost/etc hosts in Getting Started. This means you need to change the Director Uri setting that the client connects to.
You can do this in your UE project's Project Settings under Redwood in the Plugins section. You'll find a variable named Director Uri; it needs to be changed to:
ws://director.localhost
If you need to change the Director Uri setting for a packaged build, we've added a quick method to do this without messing with the Saved dir.
Create a file named redwood.json in the project folder in your client packaged build (i.e. path-to-packaged-build/Windows/YourProject/redwood.json); this should be the same folder where you see Binaries and Content folders. Set the contents fo the file to:
{
  "directorUri": "ws://director.localhost"
}
Running a Test
Testing the backend in a Kubernetes environment (locally or remotely) are very similar. For match-based games (like the Shooter Template), you can get a game server running by doing matchmaking or lobby generation. For persistent games (like the RPG Template), you'll still need to use the same yarn cli create-proxy ... command that you used when running the backend via the Dev Initiator to startup a persistent server.
Deploying Remotely
You now have a local Kubernetes cluster that hosts the same microservices that get deployed a production environment on the cloud. Most of your development and testing will be done locally, but it's important to test deploying to the cloud well before it's time to release your game.
Whenever you're ready to test deploying to the cloud, you can read more about it here.