Setting Up Unreal
This page takes an Unreal project (new or existing) and does the one-time setup every Redwood game needs: enabling the plugins, pointing the game at the backend, setting up your maps, wiring Redwood into your game framework classes, and registering your game modes and maps with Redwood.
We use C++ class names throughout, but everything on this page can be done in Blueprints with the equivalent classes and nodes. Where something is C++-only, we'll say so.
By the end, your project will have:
| What | Why |
|---|---|
The RedwoodCore plugin enabled | Provides all of the Redwood functionality |
| Project Settings pointing at the Director | So the client knows where to connect |
| An idle server map | Dedicated servers wait here until the backend tells them which map to load |
| Game modes that inherit from Redwood's | Redwood authenticates players and loads their data in the game mode |
| Redwood components on your Game State, Player State, and Pawn | Server details, player/character data, and persistence |
| Game Mode and Map Data Assets registered with the Asset Manager | How the backend's profile and map IDs map to your Unreal classes and levels |
Enable the Plugins
- Make sure the plugins are in your project's
Pluginsfolder (see Installing). - Open your project and go to Edit > Plugins. Search for Redwood and enable Redwood MMO Framework (
RedwoodCore). Enable any of the optional plugins you plan to use (RedwoodChat,RedwoodSteam,RedwoodEOS, orRedwoodGAS); you can always enable them later. - Restart the editor when prompted. Unreal will ask to rebuild the plugin modules; say yes (or build from your IDE).
If you prefer editing the .uproject directly, add the plugins to the Plugins array:
{
  "Plugins": [
    { "Name": "RedwoodCore", "Enabled": true }
  ]
}
RedwoodCore automatically enables its dependencies (SocketIOClient, LatencyChecker, and GameplayMessageRouter), which ship in the ThirdParty folder of the plugins download.
RedwoodCore supports Windows, Linux, and macOS (clients and servers), on Unreal Engine 5.4 and newer.
C++ Module Dependencies
If you reference Redwood classes or types from C++, add the Redwood module to your game module's Build.cs. You'll usually want the JSON helpers too, since much of the API passes USIOJsonObject objects:
PublicDependencyModuleNames.AddRange(new string[] {
  "Core", "CoreUObject", "Engine", "InputCore",
  "Redwood",     // RedwoodCore
  "SIOJson",     // USIOJsonObject and USIOJLibrary
});
The optional plugins have their own modules (e.g. RedwoodChat and RedwoodXMPP for chat); see the Unreal Plugin Reference for the full list.
Build Targets
Dedicated servers require a Server target. If your project doesn't have one yet, add a <YourProject>Server.Target.cs next to your other targets in Source/:
using UnrealBuildTool;
using System.Collections.Generic;

public class YourProjectServerTarget : TargetRules
{
  public YourProjectServerTarget(TargetInfo Target) : base(Target)
  {
    Type = TargetType.Server;
    DefaultBuildSettings = BuildSettingsVersion.Latest;
    IncludeOrderVersion = EngineIncludeOrderVersion.Latest;
    ExtraModuleNames.Add("YourProject");
  }
}
A Client target (TargetType.Client) is also recommended so you can ship a client without server code. You don't need either target for local development (the backend runs your servers through the editor executable), but you'll need the Server target to package servers, and packaging a Server target requires an Unreal source build.
Project Settings
Open Edit > Project Settings > Plugins > Redwood. The defaults are fine for local development, but here's what they mean:
| Setting | Default | What it does |
|---|---|---|
| Director Uri | ws://localhost:3001 | Where the game client connects to the Director. For local development either ws://localhost:3001 or ws://director.localhost:3001 works. For deployed environments this becomes something like wss://director.yourgame.com. |
| Auto Connect to Servers | true | When the backend assigns the player a server (matchmaking, lobbies, queues, zone transfers, or following their party), the client automatically travels there. If you turn this off, bind OnRequestToJoinServer and run the console command yourself (handy for loading screens). |
| Servers Auto Connect to Sidecar | true | Dedicated servers connect to the sidecar on startup. Leave this on; without it players can't be authenticated. |
| Redwood Json Enabled | true | Lets a redwood.json file next to the packaged game override the Director Uri (e.g. { "directorUri": "wss://director.example.com" }), so one build can point at different environments. |
| Public Signing Key | empty | If set, redwood.json overrides must be signed with the matching private key (yarn sign-redwood-json in the backend). |
| Ping Attempts / Ping Timeout / Ping Frequency | 3 / 3 s / 10 s | How the client measures latency to each region for matchmaking. |
These save to Config/DefaultProjectSettings.ini under [/Script/Redwood.RedwoodSettings]. Every setting is described in the settings reference.
Editor Preferences
Redwood can run Play-In-Editor sessions with or without the backend. Open Edit > Editor Preferences > Plugins > Redwood (also available in the Play button's dropdown under Redwood Options):
| Setting | Default | What it does |
|---|---|---|
| Use Backend in PIE | false | When enabled, PIE clients talk to the real backend (the Dev Initiator). When disabled, every Redwood call is stubbed and character/world data is stored in JSON files in Saved/Persistence. |
| Fallback Zone Name | empty | When not using the backend, which zone's spawn points to use. |
Turn on Use Backend in PIE now. We'll use the backend for the next few pages, and we'll come back to the no-backend workflow in Running without the Backend.
This is a per-user preference (saved in your Saved/Config folder), so each person on your team sets it themselves. If you want a project-wide default, add this to Config/DefaultEditorPerProjectUserSettings.ini:
[/Script/RedwoodEditor.RedwoodEditorSettings]
bUseBackendInPIE=True
Maps
Redwood games typically use at least three kinds of maps:
| Map | Example | Used by | Purpose |
|---|---|---|---|
| Title/frontend map | L_Title | Clients | Login, character selection, and choosing what to play. Set as the Game Default Map. |
| Idle server map | L_Empty | Dedicated servers | A completely empty level that servers boot into. Redwood reports the server as ready and then the backend tells it which map and game mode to load. Set as the Server Default Map. |
| Gameplay maps | L_Arena, L_Overworld | Dedicated servers (and clients once they join) | Where the game happens. Referenced by Map Data Assets. |
- Create an empty level (File > New Level > Empty Level) and save it as something like
/Game/Maps/L_Empty. - In Project Settings > Project > Maps & Modes, set Server Default Map to your idle map and Game Default Map to your title map (we'll build the title screen in Building the Main Menu; an empty level with a widget is enough to start).
The idle map matters more than it looks. Servers boot it with whatever game mode it's configured with, so keep it empty and use a plain game mode (not one of your Redwood game modes) in its World Settings to avoid running gameplay logic before the real map loads.
Game Framework Classes
Redwood plugs into the standard Unreal gameplay framework. Make these changes to the classes your gameplay maps use (the title map can keep using plain engine classes).
Game Mode
Every game mode that the backend will load must inherit from one of Redwood's game modes:
| If your game mode inherits from | Change it to inherit from |
|---|---|
AGameModeBase | ARedwoodGameModeBase |
AGameMode | ARedwoodGameMode |
Change the parent class and include RedwoodGameModeBase.h or RedwoodGameMode.h.
These classes behave exactly like their engine parents in Standalone and PIE-without-backend, but on dedicated servers they:
- Verify each joining player with the backend (using a one-time token the client passes in the join URL) and kick anyone who doesn't check out
- Hold off spawning the player's pawn until their character data has loaded
- Spawn players at their last saved location, or at a Zone Spawn
- Periodically save character and world data (every
DatabasePersistenceIntervalseconds,0.5by default)
This is required; the Game Mode Data Asset only accepts subclasses of the two Redwood classes. If your game mode comes from a framework or plugin (for example Lyra's ModularGameplayActors plugin), reparent the framework's base classes instead. For Lyra that means changing AModularGameModeBase to inherit from ARedwoodGameModeBase and AModularGameMode from ARedwoodGameMode in your copy of the ModularGameplayActors plugin, and adding the components below to the modular Game State and Player State classes.
Lyra's dedicated servers also try to pick an experience as soon as they boot (ALyraGameMode::TryDedicatedServerLogin). Make that return early on dedicated servers so the server idles until Redwood loads the map, and pass the experience name through your game profile's data (e.g. Experience: "B_ShooterGame_Elimination"), which Redwood adds to the map URL as ?Experience=....
Game State
Add a Redwood Game State Component (URedwoodGameStateComponent) to your Game State class. It replicates the server's details (realm, proxy, zone, and shard) to clients, which is how clients know where they are. You can read them with GetServerDetails() and bind OnServerDetailsChanged.
Player State
Add a Redwood Player State Component (URedwoodPlayerStateComponent) to your Player State class. This is where Redwood stores the authenticated player's data (RedwoodPlayer) and their character's data (RedwoodCharacter) on the server, and it gates pawn spawning until that data has loaded.
In the component's details panel, enable Component Replicates. The component uses a client RPC to tell the owning player when they're transferring zones, which only works on a replicated component.
ARedwoodPlayerState still exists for older projects but is deprecated. Use the component on your own Player State instead.
Pawn
If you want Redwood to persist your character's data (you almost certainly do), you'll add a Redwood Character Component (URedwoodCharacterComponent) to your Pawn or Character class. That needs a bit more setup, so we've given it its own page: Saving Player Data. Hold off on adding it until then.
If you add a URedwoodCharacterComponent without setting up its data variables, players will be kicked when they join a server ("Could not load player character data"). Follow the Saving Player Data page when you add it.
Game Mode and Map Assets
The backend refers to game modes and maps by string IDs in its game profiles (the game.yaml you wrote in Installing). When the backend starts a server, it sends the server a game mode ID and a map ID, and Redwood looks them up in two kinds of Data Assets.
Create the assets in the Content Browser with Right Click > Miscellaneous > Data Asset, picking the class. We recommend keeping them all in one folder (e.g. /Game/Redwood).
Game Mode Assets
Create one RedwoodGameModeAsset per game profile:
| Property | What to set it to |
|---|---|
| Redwood Id | The profile's id from game.yaml (e.g. deathmatch). Lowercase, no spaces, unique. |
| Game Mode Type | Game Mode Base or Game Mode, matching which Redwood class your game mode inherits from |
| Game Mode Base Class / Game Mode Class | Your game mode class (the field shown depends on Game Mode Type) |
| Show in Front End, Display Name, Display Description, Display Icon | Optional. Redwood doesn't use these; they're there for your menus (e.g. a mode picker when hosting a lobby). |
You can point multiple Game Mode Assets at the same game mode class (e.g. an overworld profile and a dungeon profile that share one game mode).
Map Assets
Create one RedwoodMapAsset per gameplay map:
| Property | What to set it to |
|---|---|
| Redwood Id | The map ID used in a profile zone's maps list in game.yaml (e.g. arena). Lowercase, no spaces, unique. |
| Map Id | The level to load. The picker lists levels known to the Asset Manager's Map type (by default everything under /Game/Maps). |
| Map Name | Optional display name for your menus |
Asset Manager
Redwood finds these assets through the Asset Manager, so you need to register their types. If you skip this, servers will never finish starting (the server logs an error and never connects to its sidecar).
-
Open Edit > Project Settings > Game > Asset Manager.
-
Under Primary Asset Types to Scan, add an entry for each Redwood asset type:
Primary Asset Type Asset Base Class Has Blueprint Classes Is Editor Only Directories Cook Rule RedwoodGameModeAssetRedwoodGameModeAssetfalsefalsethe folder with your Data Assets Always CookRedwoodMapAssetRedwoodMapAssetfalsefalsethe folder with your Data Assets Always CookRedwoodSyncItemAssetRedwoodSyncItemAssetfalsefalsethe folder with your Data Assets Always CookThe
RedwoodSyncItemAssettype is only needed if you use world data or Sync Items, but it doesn't hurt to add it now. -
Make sure the default
Mapentry still exists (it's what the Map Id picker uses). If your levels aren't under/Game/Maps, add their folders to it.
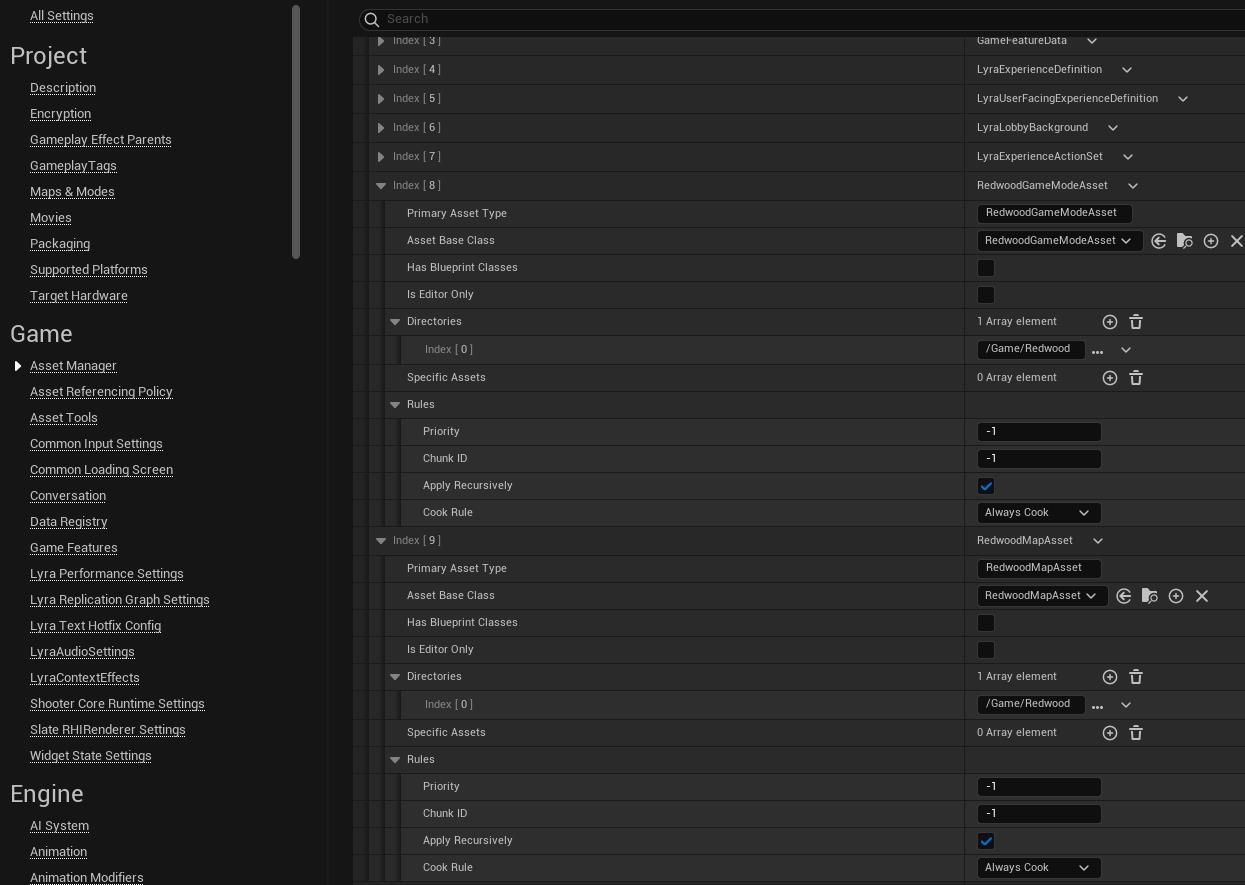
These settings are saved in Config/DefaultGame.ini. If you'd rather add them directly, this is the equivalent (change the Path to your folder):
[/Script/Engine.AssetManagerSettings]
+PrimaryAssetTypesToScan=(PrimaryAssetType="RedwoodGameModeAsset",AssetBaseClass="/Script/Redwood.RedwoodGameModeAsset",bHasBlueprintClasses=False,bIsEditorOnly=False,Directories=((Path="/Game/Redwood")),SpecificAssets=,Rules=(Priority=-1,ChunkId=-1,bApplyRecursively=True,CookRule=AlwaysCook))
+PrimaryAssetTypesToScan=(PrimaryAssetType="RedwoodMapAsset",AssetBaseClass="/Script/Redwood.RedwoodMapAsset",bHasBlueprintClasses=False,bIsEditorOnly=False,Directories=((Path="/Game/Redwood")),SpecificAssets=,Rules=(Priority=-1,ChunkId=-1,bApplyRecursively=True,CookRule=AlwaysCook))
+PrimaryAssetTypesToScan=(PrimaryAssetType="RedwoodSyncItemAsset",AssetBaseClass="/Script/Redwood.RedwoodSyncItemAsset",bHasBlueprintClasses=False,bIsEditorOnly=False,Directories=((Path="/Game/Redwood")),SpecificAssets=,Rules=(Priority=-1,ChunkId=-1,bApplyRecursively=True,CookRule=AlwaysCook))
Cooking the Map Data Assets doesn't cook the levels they point to. When you get to packaging, make sure every gameplay map, your idle server map, and your title map are in Project Settings > Packaging > List of maps to include in a packaged build (or are otherwise cooked).
The Data Asset classes aren't exported from the Redwood module, so you can't reference URedwoodGameModeAsset, URedwoodMapAsset, or URedwoodSyncItemAsset from your own C++ code. You don't need to; Redwood loads them itself.
Zone Spawns
Every zone needs to know where to put players who don't have a saved location yet. Redwood picks the spawn point in this order:
- The character's last saved location, if it was in this zone
- An
ARedwoodZoneSpawnactor in the level whose Zone Name matches the server's zone and whose Spawn Name isdefault - Any
ARedwoodZoneSpawnfor the zone - Unreal's normal Player Start logic
For a simple single-zone game, normal Player Starts are fine. For anything with multiple zones (or multiple entry points into a zone), place Redwood Zone Spawn actors in your level:
| Property | Meaning |
|---|---|
| Zone Name | The zone key from game.yaml (e.g. main or town) |
| Spawn Name | default for the normal entry point; other names for specific entrances (used when traveling between zones) |
| Spawn Radius | Randomly offset players within this radius so they don't stack |
| Randomize Rotation | Give each player a random yaw |
Redwood traces down from the spawn point to find the ground, so you don't need to place it precisely on the floor.
Checklist
Before moving on, double check:
-
RedwoodCoreis enabled and the project compiles - Use Backend in PIE is on
- Server Default Map is an empty idle level, and Game Default Map is your title level
- Every gameplay game mode inherits from
ARedwoodGameModeBaseorARedwoodGameMode - Your Game State has a
URedwoodGameStateComponent - Your Player State has a
URedwoodPlayerStateComponentwith Component Replicates enabled - There's a
RedwoodGameModeAssetfor every profileidingame.yaml, and aRedwoodMapAssetfor every map ID in its zones - The Asset Manager scans
RedwoodGameModeAsset,RedwoodMapAsset, andRedwoodSyncItemAssetwith Always Cook
Your project is ready to talk to Redwood. Next, let's build the main menu so players can log in and join a server.